|
|
11/27/2019 |
The bevel gauge is a simple little tool that enables me to avoid guesswork and get consistent angles on my chisels, plane blades and other tools. I typically eyeball almost everything I grind or sharpen. Most of the time I just want to maintain the angle I already have. But over time, it's easy for a bevel angle of a frequently-sharpened tool to creep up, or a new tool to start out with a suboptimal or even counter-productive grind angle.
I am probably less fussy about specific angles than are many woodworkers. The rule of thumb for most edges is 25° followed by a 5° micro-bevel. Unless I see a tool performing badly I don't think too much about a degree or two either way. The only time I really get fussy is working with paring chisels, which are typically ground at 20° or less, depending on if the steel can take it.
I do sometimes wonder if my tools' angles are too steep for "optimum" performance. Whatever that is. The lower the angle of the blade, the less force required to push it forward -- and the more control you have. From my standpoint, not being either Atlas or particularly dexterous, having more control while still getting stuff done is the goal. By the way, angles are very important for carving tools. A fat angled carving tool or knife is hard to propel in the wood effectively. You lose control, you need a mallet, and you get tired.
My solution to all of this is to periodically check the grind angle when I am sharpening. This doesn't mean I will freak out if I am off by a half a degree, but it does mean I might try to grind a little shallower or steeper depending on which was I want to go - shallower usually being better.
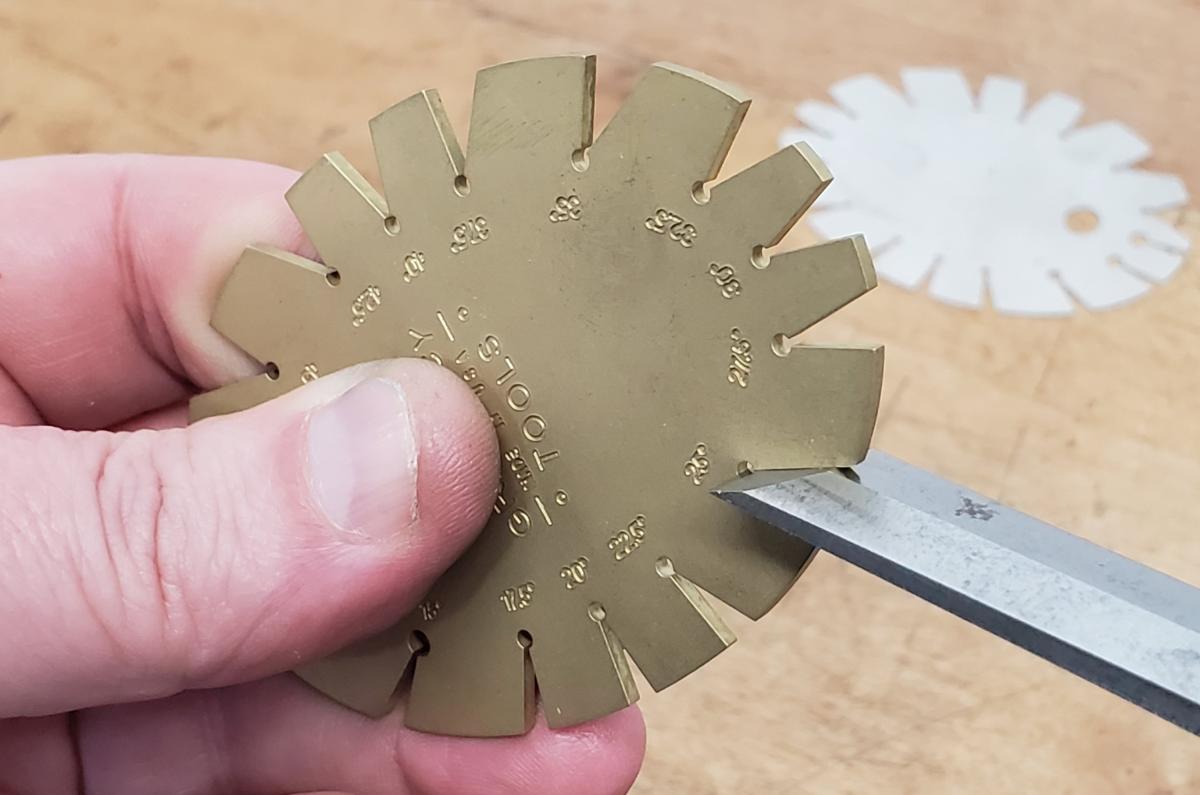
To measure grind angles, I used to use a little round brass bevel gauge with a bunch of angles cut into it. This worked great until I dropped it, it rolled away, and got misplaced. It's a fairly inexpensive gauge but I always had issues with it.
The text was hard to see. I was always holding it the wrong way, and since the gauge was small and round, it was easy to lose it temporarily or permanently.
When we designed our new gauge, we made it oval. This shape gives me instant orientation and makes it a lot easier to find the angle you want. The annealed stainless gauge has easy-to-read white engraved lettering that jumps out at you. To keep costs down, we only put the lettering on one side of the stainless steel version of the gauge. On the fancier brass gauge, we engraved both sides -- but there is no color in the letters. The advantage of the former style is you can read it very easily. The advantage of the latter style is that you don't have to contort yourself to read the side of the gauge that is away from you.
Older style bevel gauges were made by stamping them out, which rounds the edges. I find the round edges coupled with thin material makes it hard to get a consistent reading. This was a real goal for our design: no rounded edges! The stainless gauge is make by etching the metal with acid. This gives a very crisp edge to check against, although the material is thinner than that of the premium brass gauge. The premium brass gauge is a full 1/16" thick -- thicker than anything else on the market. But just making it thick wasn't the total answer. There are basically four ways to make cutouts: Stamping is the old easy way out. As already noted, stamping rounds the edges -- and I don't like it. Laser cut or Waterjet are both are perfectly okay methods, but in sizes this small, waterjet has issues. Both methods give you a slightly tapered edge. I wanted a square edge with a very positive reading. We used electrical discharge machining (EDM), aka wire burning. EDM allows you to trace a pattern and get a perfectly straight, square cut that is totally on the money. Then we mechanically engraved the lettering and numbers. The cost of EDM and the cost of using such thick material is higher that I would like, but the solidity of the gauge and the way it feels in the hand makes me want to go out and measure things.
I can't in good faith tell you that either (gauge is "better" than the other. Both work well and I think both are massive improvements over existing similar bevel gauges. But the fancy one is like a fine car. It doesn't get you to the store any faster (given legal speed limits) but it is a nicer drive. And that's kind of how I feel about the (brass bevel gauge. It really feels good in the hand, better than I had hoped for, and for a simple tool, it shows how subtly can take a design to the next level.
P.S. We are really pleased to announce that we are delivering the Gramercy Bevel Gauges now, and have started delivery of our other new Gramercy tool - the Dovetail Gauge. We always aim for new tools for the holiday season, but this year is the first time we were able to get more than one tool out the door in time.
Happy Thanksgiving!! From all of us at TFWW.
P.P.S. We are closed Thursday but open Friday, Nov 29th with Saturday hours (11 AM - 5 PM).
Fun fact: When I took the pictures for the product description I held the bevel gauge the way I normally do. But I am left-handed. When I took the photo for this blog a few minutes ago, I swapped my hands around to the right-handed view - just to be one of the crowd.
|
Add a Comment |
|


 Joel's Blog
 Built-It Blog
 Video Roundup
 Classes & Events
 Work Magazine